3D Graphics, Tutorials and Tips
Using 3DS Studio Max and Mental Ray


3D Graphics, Tutorials and Tips
Using 3DS Studio Max and Mental Ray


Dr. Who's arch-nemesis, the Dalek as classic Genesis and New Series versions
H.M.S. Nelson, big gunned capital warship from WWII
Edwardian house. Old school architectural renderings
Assorted models and renders
These tutorials focus on using the Mental Ray renderer (iRay tutorials in preparation). The production shaders enable the easy integration of 3d Models into photographs.
These renders have been created to visualise scientific concepts and experimental layouts. A 10 minute HD film was also created.
Geological Waste Disposal Bluray/HD 2009
Geological Waste Disposal DVD 2003
PSG Experiment - Grimsel (Nagra)
Rendering and compositing of 3D models for international Clients
Front cover for Burton Power Catalogue 2012
Front cover for Burton Power Catalogue 2014
Front cover for Burton Power Catalogue 2015
Front cover for Burton Power Catalogue 2016
Wavemaster Design : Ferry design renders
Car Colour Services : Colour and spraying services
Volkswagen Crafter for Volkswagen Australia
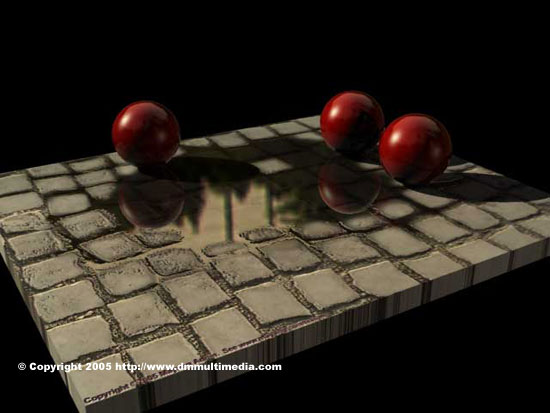
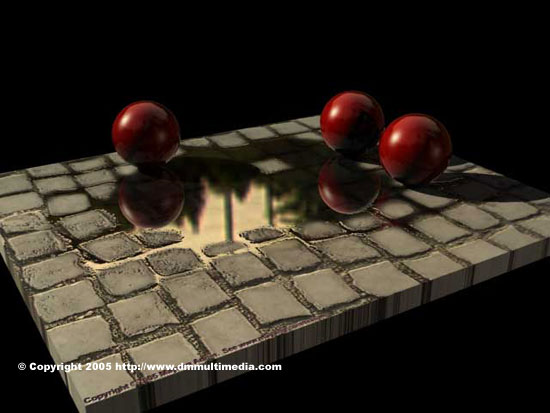
DMMultimedia | 3d tutorials | Puddle Texture
Sound knowledge of 3D Max texturing and mapping is ESSENTIAL
 ALL Photoshop Textures and HDRIs are included along with the Studio Max Scene file for download - see below.
The Textures.
You can skip this and download the Max file. But if you really want to find out how it works read on.
I created the texture with 2 main textures blended together. You could probably get away with just the one ... but for finer control 2 are needed. One is the basic puddle texture - the watery part, the other is the dry stone part. This works just the same for tarmac, just that the edges to the water will have little stones and gravelly bumps and not edges as I have.
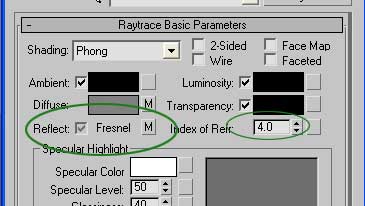
The Puddle Water is constructed from a Raytrace material. I need 3 maps :
So let's look at each of these maps ...
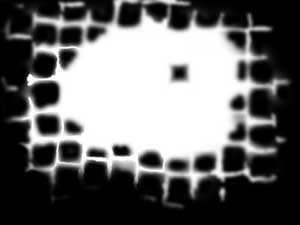
There is one common part and that is the modified area that I will use for a bump or reflect map - basically the area where the water is. This is a seperate layer in photoshop (also one copied and inverted - thus one black, one version white). By blending these layers over the diffuse layer, the bitmap (grayscale modified) bumpmap texture and a black layer (reflect layer) we have the textures we need.
So blending the diffuse layer with this water area (black version) to give the effect of a damp area (the original picture does not have this dark patch)
(1) :

And now using the white copy against a layer with a plain black background for the reflect texture
(2) :
And with the white version against the greyscale for the bump map
(3) (Update: for better effect the actual puddle area should be BLACK not WHITE as shown below):
With those applied to the diffuse, reflect (turn the reflect to Fresnel - see below) and bumpmap slots we have the main water puddle texture.
Why blend this with yet another texture ?
Well ... this puddle layer has a specular that is shiny and sparkly for the water. Great for the puddle but not good for the dusty ground.
So ... create a second texture this time a normal shader with the same diffuse texture (1). and place this texture and the puddle texture in a blend material using the reflect map (2) as the blend. This means the water shines through but the ground is dusty.
Setting the reflection to Falloff
I've had a quick play with the reflective settings and the best method I have found so far (couldn't get the adjusting other method to work) is to go to the Puddle material and adjust the reflective type to fresnel - shown below, click on where it says Reflect to cycle through options :