
3D Graphics, Tutorials and Tips
Using 3DS Studio Max and Mental Ray


3D Graphics, Tutorials and Tips
Using 3DS Studio Max and Mental Ray


Dr. Who's arch-nemesis, the Dalek as classic Genesis and New Series versions
H.M.S. Nelson, big gunned capital warship from WWII
Edwardian house. Old school architectural renderings
Assorted models and renders
These tutorials focus on using the Mental Ray renderer (iRay tutorials in preparation). The production shaders enable the easy integration of 3d Models into photographs.
These renders have been created to visualise scientific concepts and experimental layouts. A 10 minute HD film was also created.
Geological Waste Disposal Bluray/HD 2009
Geological Waste Disposal DVD 2003
PSG Experiment - Grimsel (Nagra)
Rendering and compositing of 3D models for international Clients
Front cover for Burton Power Catalogue 2012
Front cover for Burton Power Catalogue 2014
Front cover for Burton Power Catalogue 2015
Front cover for Burton Power Catalogue 2016
Wavemaster Design : Ferry design renders
Car Colour Services : Colour and spraying services
Volkswagen Crafter for Volkswagen Australia
DMMultimedia | 3d tutorials | MR Water/Caustics
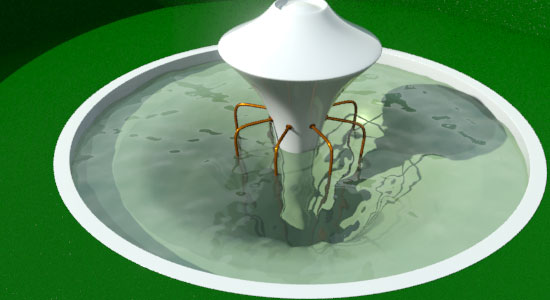
Water caustics - the distortion and concentration of lights through a transparent medium - think of the refelcted light patterns from a swimming pool, and the light patterns under the waves. This is a small section explaining my exploration into re-creating caustics using Mental Ray. Using the Mental Ray Arch&Design shader allows us to use a "fade to colour at a depth" setting to give us more realism to simulate depth in water.
Below are a few test animations testing the creation of these effects, and under a detailed explanation on how to create one of the scenes.
This scene was created in 3DS MAX 2008 (previous versions on this website were rendered in Max 8 - many changes have happened since then so the settings had to be updated). These settings may not work for everyone, just what I found worked for me. I was wanting to get the effect you see in swimming pools, with dancing caustics on the inside of the water and bounced from the water.
This Flash video shows the caustic effect :
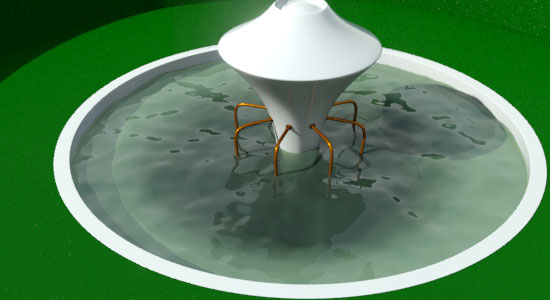
This scene uses an A&D (Architectural and Design) Mental Ray material for the water. This is a simple semi-transparent setup but also using Refraction - Color at Max Distance setting on the Advanced Rendering Options to simulate the depth of the water and fall-off of lighting. The ripples are created by adding an Ocean shader to the Displacement slot of the A&D material. Putting the Ocean shader in the bump slot would also work but the water would not appear to move at the edges.
The basic settings for the A&D Water material are as follows :
Key to the effect is setting the Refraction Color at Max Distance to give the effect of depth to the water :
The settings for the Ocean texture are shown below. The map is in the Displacement slot of the A&D Material.

The effect of switching on Refraction Color at Max Distance to simulate depth is shown below.
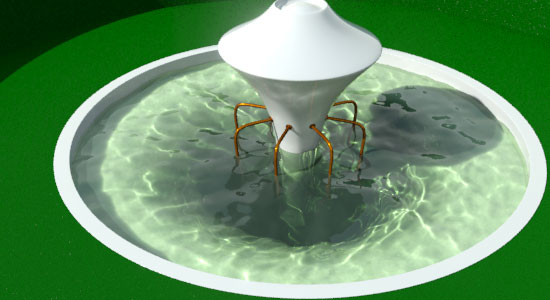
Adding Caustics
To add the caustics we need to switch Caustics on and adjust some settings. These settings were found by trial and error - no guarantee these are the best settings. These will be processor intensive - the settings have not been optimised (created using a quad core).
Switch on Caustics and adjust the settings as below :
The addition of Caustics using the above settings gives this effect :
Additional Settings in the above scene :
The scene uses a single mr Spot Light (intensity = 1.3), mr Skylight (intensity = 0.6) using a gradient ramp for a sky texture, mr Photographic exposure (Settings shown below). A glare shader is added to the Camera Effects rollout in the Renderer tab of the Render Setup : Mental Ray renderer window (F10).
Download the Scene file and explore - in Max 2008 Format - all textures included to generate the above animation.
Download the 3DS MAX 2008 File : Caustics_tutorial.zip (72 Kb)
|