
3D Graphics, Tutorials and Tips
Using 3DS Studio Max and Mental Ray

3D Graphics, Tutorials and Tips
Using 3DS Studio Max and Mental Ray


Dr. Who's arch-nemesis, the Dalek as classic Genesis and New Series versions
H.M.S. Nelson, big gunned capital warship from WWII
Edwardian house. Old school architectural renderings
Assorted models and renders
These tutorials focus on using the Mental Ray renderer (iRay tutorials in preparation). The production shaders enable the easy integration of 3d Models into photographs.
These renders have been created to visualise scientific concepts and experimental layouts. A 10 minute HD film was also created.
Geological Waste Disposal Bluray/HD 2009
Geological Waste Disposal DVD 2003
PSG Experiment - Grimsel (Nagra)
Rendering and compositing of 3D models for international Clients
Front cover for Burton Power Catalogue 2012
Front cover for Burton Power Catalogue 2014
Front cover for Burton Power Catalogue 2015
Front cover for Burton Power Catalogue 2016
Wavemaster Design : Ferry design renders
Car Colour Services : Colour and spraying services
Volkswagen Crafter for Volkswagen Australia
DMMultimedia | 3d tutorials | mr Paint Techniques | Texturing : Paint overview
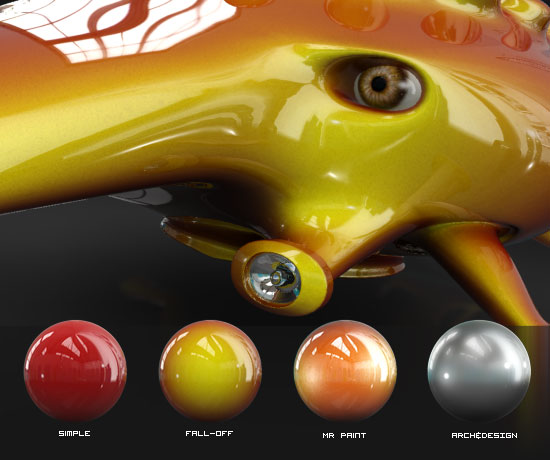
 Before talking about paint settings, we will discuss the environment that will be reflected. As paint is a reflective material it is absolutely essential we have something to reflect. Before we start to create the paint material we will create an environment map for the reflections. This section will discuss different methods to create and use environment maps
Most people automatically assume that you need to use an HDRI map for good reflections. While using a good HDRI (High Dynamic Range Image) and setting the range will produce great results, it is also possible to use standard LDR (Low Dynamic Range - standard 8-bit bitmap) images and fake some of the benefits of an HDRI.
A lot of people use an HDRI map without understanding why and what makes the renders look so good. The basic reason in using an HDRI over a standard LDR image is that fact that there are a huge range of light values above a standard LDR's maximum white value.
LDR 8 bit image maximum white = 255,255,255 - range 0-255 per channel, 2^8
HDRI 32 bit image maximum white = 65535,65535,65535 - range 0-65535 per channel, 2^32
So we have more refinement in the values, how does that help us ? If we take a LDR and save it as a HDRI we don't get an HDRI image - a lot of possible values above the 255,255,255 will not be used. Why is that relevant ?
If you consider how the render engine (almost all versions) calculates reflections it becomes apparent. As a ray is traced from the camera back to the environment (or env map) it will take a pixel from the env map and show that in the reflection. But it is not 1:1, as the energy or reflection will not be 100% (At least it shouldn't be for car paint !). It will be dimished somewhat. This means that our pure white pixel in a LDR map (255,255,255) will decrease in the reflection to a grey colour (<255,<255,<255). So a pure white area in an env map will map to a grey reflection.
With an HDRI you can bracket the values so you can spread the white value between the old LDR maximum white 255,255,255 all the way to 65535,65535,65535. This means we can have a huge range of whites from bright white to super white. A pixel with value 65535,65535,65535 even if it decays as it reflects in an object will still be rendered as a pure white reflection in your image.
OK, but we could boost our LDR so that it has stronger values. True, but then ALL values will be boosted and you will have no dark areas (0,0,0) as they will be boosted to grey from black. The secret is to only boost the white ranges you want (an HDRI has a large amount of information in the white areas and mid areas and dark areas). It is possible to use curves to boost an area of colour but it is difficult to boost that small range non-linearly (Exponentially or Logarithmically) using lots of curve tweaking. We will have to fake that.
First we will look at standard HDRI reflection setup
These examples use the kc_outside_hi.hdr HDRI that ships as standard with Max 9. I have adjusted some other small settings but this will show the general results obtained by using an HDRI and give us a reference for our alternative LDR method.
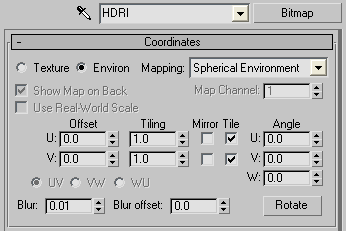
Load in the bitmap, and setup the HDRI settings as follows :

With the bitmap loaded we need to use it as an Env map we need to adjust a few parameters. Set the type to "Environ" with "Spherical Environment" mapping and set "Blur" to 0.01 - Setting "Blur" to 0.01 will enable us to see clearly the reflections in the Material Editor.
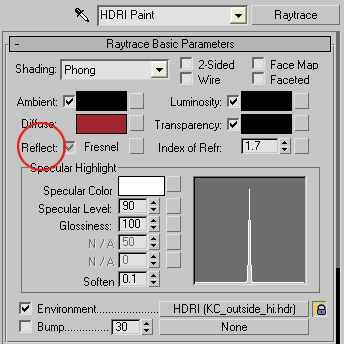
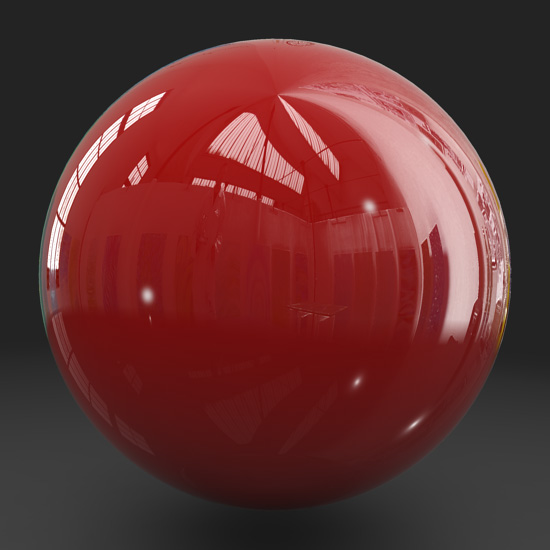
Now we setup a Super Simple raytrace paint material. Load in a standard Raytrace material. Drop the HDRI map we created above into the Environment slot. In this example I also made the specular highlights very small and intense. Select Fresnel reflections by clicking on the Reflect text to change between different reflection methods. Adjust the "Index of Refr." to 1.7 making it more reflective than the standard 1.55.
Now with a lighting setup similar to the default Schnorbill scene (in Environment settings for the Logarithmic settings enable Process Background and Environment Maps), we render and get the following :
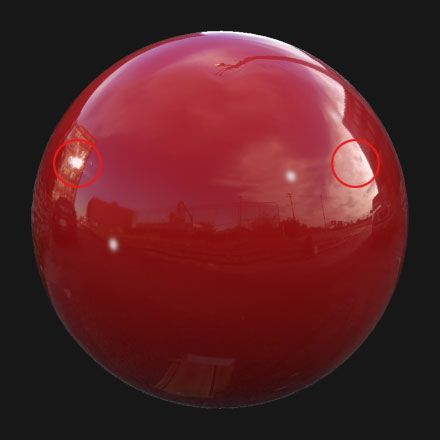
Of note is the highlight kick we get from sunlight reflected in the windows on the tower block. Note how this powerful reflection remains pure white (in 8 bit RGB terms 255,255,255). And the sky/clouds near the sun are also stronger ... where elsewhere the env map is less intense.
As we are using Fresnel reflections this alters the reflectivity of the material so that it becomes much more reflective as the angle of the surface moves away from perpendicular to the viewer - more reflective on the edges. This can be seen on the edges here, especially in the top right side and bottom edges.
This is one method that can be used to fake the basic effects of an HDRI. It is constructed using a Mix material and normal JPEGs. We will take a standard JPEG and mimic the intense white spots from an HDRI.
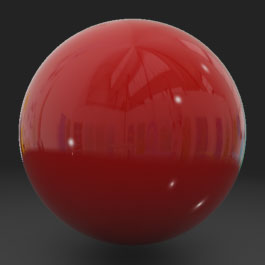 Simple Paint mat - normal JPEG |
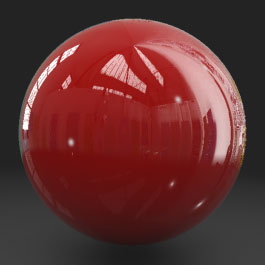 Simple Paint mat - Fake HDRI MIX |
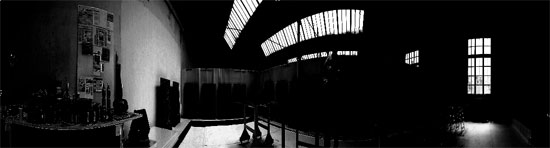
The above material uses a JPEG that can be downloaded from this site (also has a great selection of other JPEGs to experiment with) :
http://www.wpanorama.com/panoramas.php?page=01h (Paint shop in Rheinfelden - 4670 x 768)

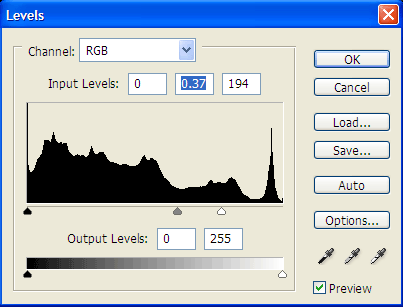
Using this JPEG we will create a Mix map material where we will blend between two maps. One will be the standard JPEG and the other will be a boosted output JPEG. First we will modify the above JPEG using Photoshop create the mask needed.
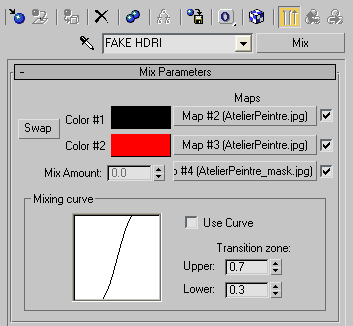
With the 2 versions of the JPEG (atelierpeintre.jpg and atelierpeintre_mask.jpg) create a MIX material in an empty slot:
Select an empty slot, then select the ![]() button and choose the Mix map (it will be lower down the list). Now we can add our bitmaps to the Mix material.
button and choose the Mix map (it will be lower down the list). Now we can add our bitmaps to the Mix material.
The final step is to boost the atelierpeintre.jpg in the Color#1 slot. in the Output rollout boost the Output Amount to 6.0.
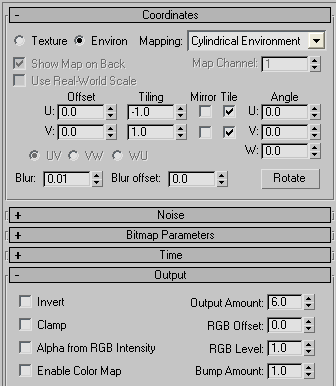
What this does is mask the JPEG so that we only boost the areas that are white in our mask, and use the normal bitmap in all other areas. The Output Amount will need to be adjusted for different JPEGS or effects (higher or lower).
Note for Max 8 users: Max 8 handles Log Exposure very differently from Max 9 - it will require different values for the Brightness, Contrast and Output Amounts. These will produce VERY different results when switching between Max 8 and Max 9.
Using the above methods I get the image below (there is a little bit of pinching in the reflection, for best results we need a spherical mapped JPEG). In the next section we will cover more realistic paint colours and effects. We will also explore the Mental Ray Car Paint shader and its settings.


 Add a Bitmap map (same method as above) in all 3 slots (